
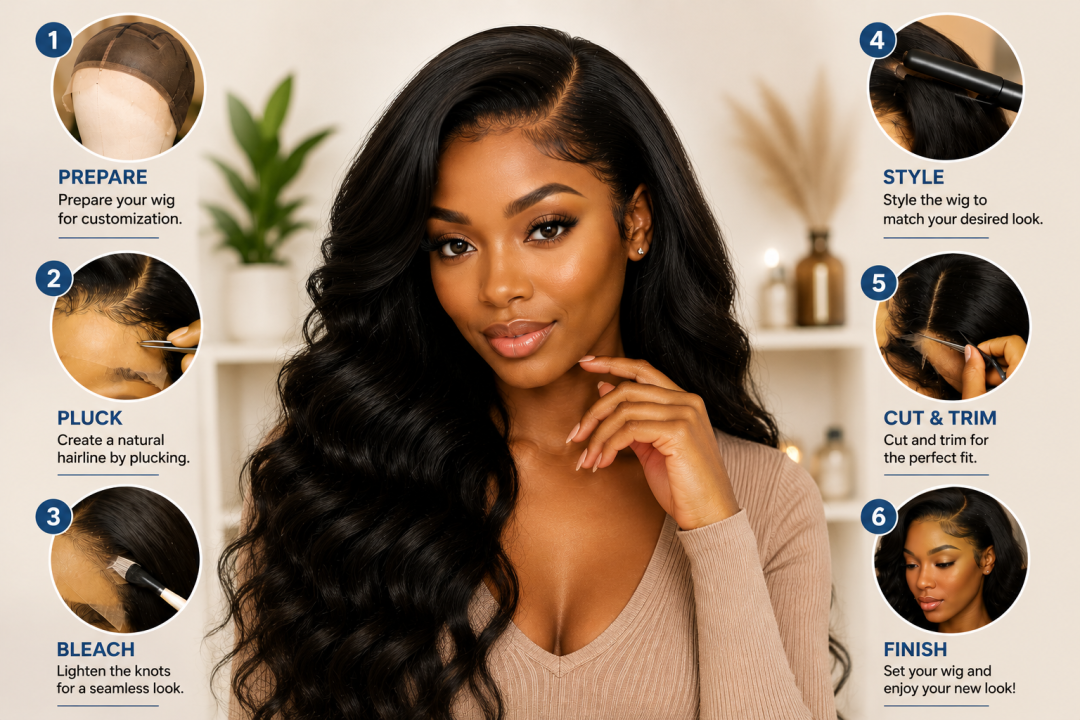
A wig should never feel like something you are trying to “make work.”
It should feel comfortable, believable, and easy to wear in your everyday life.
That is why customization matters.
The right adjustments can take a wig from looking store-bought to looking like it naturally belongs to you. A softer hairline, a better fit, a more natural part, or even small styling changes can completely transform the overall look and confidence you feel wearing it.
Whether you are brand new to wigs or already wear them regularly, this beginner-friendly guide will walk you through simple customization tips that help your wig look more natural, feel more secure, and blend beautifully with your everyday style.
Why Wig Customization Makes Such a Difference
Most wigs look better after a few personal adjustments.
Even high-quality wigs may need small changes to better fit your face shape, skin tone, or styling preference. The goal is not perfection. The goal is creating a wig that feels more like you.
Customization can help:
-
Create a more natural-looking hairline
-
Improve comfort and fit
-
Make the wig easier to style
-
Help the lace blend better
-
Give the hair softer, more realistic movement
For many women, customization is the step that makes the wig finally feel effortless.
What You Need Before You Start
You do not need a salon full of tools to customize your wig at home. A few basics can make the process much easier.
Beginner-Friendly Wig Tools
-
Wig stand or mannequin head
-
T-pins or wig clips
-
Rat-tail comb
-
Tweezers
-
Hair shears
-
Mousse or styling foam
-
Lace tint spray or foundation
-
Flat iron or curling iron
-
Heat protectant spray
Keeping your tools simple helps the process feel less overwhelming, especially if this is your first time customizing a wig.
Step 1: Prep Your Wig
Wash and Condition the Hair
Before styling or customizing, start with a clean wig.
Washing removes factory residue, softens the hair, and helps the wig move more naturally.
Use a sulfate-free shampoo and moisturizing conditioner to keep the hair soft and manageable.
Quick Prep Tips
-
Detangle gently from ends to roots
-
Wash using lukewarm water
-
Avoid rough scrubbing
-
Let the wig air dry on a wig stand
-
Skip excessive heat while drying
This step alone can make a wig look softer and more realistic.
Adjust the Wig Fit
A secure fit changes everything.
If a wig feels too tight, too loose, or constantly shifts, it becomes uncomfortable and harder to wear confidently throughout the day.
Most wigs include adjustable straps inside the cap. You can also add an elastic band for extra security and a more glueless-friendly fit.
A properly fitted wig should feel snug without causing pressure or headaches.
Step 2: Customize the Hairline
Pluck the Hairline Carefully
One of the biggest signs of an unnatural wig is a dense hairline.
Softly plucking the front helps create a more realistic, scalp-like appearance.
Simple Plucking Tips
-
Work slowly in small sections
-
Focus around the temples first
-
Avoid removing too much hair at once
-
Step back often to check your progress
The goal is softness and realism, not an overly thin hairline.
Trim the Lace
Cutting the lace can feel intimidating at first, but taking your time makes a huge difference.
Use sharp shears and trim close to the hairline while leaving a small amount of lace for blending.
If needed, apply lace tint spray or a small amount of foundation underneath the lace to help match your skin tone more naturally.
Step 3: Style the Wig Naturally
Create Soft Baby Hairs
Baby hairs are optional, but when done lightly, they can help soften the overall look.
The key is keeping them natural and minimal.
Avoid overly dramatic swoops if your goal is an everyday, realistic finish.
A little styling gel and a light hand go a long way.
Define the Part
A clean part helps the wig look more believable.
Use a rat-tail comb to create your preferred parting space, then lightly pluck along the line if needed to create a more realistic scalp effect.
Adding a little mousse along the part helps keep everything neat and polished.
Style with Heat Carefully
Whether you love sleek straight styles, soft curls, or body waves, heat styling helps personalize the wig to your taste.
Always use heat protectant before styling.
Working in small sections helps the hair look smoother and prevents unnecessary heat damage.
For a softer everyday look:
-
Use lower heat settings
-
Avoid over-curling
-
Focus on movement instead of stiff styles
Natural-looking hair usually has softness and flow, not perfect uniform curls.
Step 4: Add Color or Dimension
Color can completely change the feel of a wig.
Some women love soft highlights for dimension, while others prefer bold custom colors that make a statement.
If you are coloring a human hair wig:
-
Always strand test first
-
Use quality hair color products
-
Deep condition afterward
-
Avoid rushing the process
Healthy-looking hair always looks more luxurious than overly processed hair.
If you are nervous about permanent color, try temporary color sprays or subtle highlight pieces first.
Step 5: Maintain Your Customized Wig
Once your wig is customized, proper maintenance helps keep it looking beautiful longer.
Easy Wig Maintenance Tips
-
Wash every 8–10 wears
-
Store on a wig stand when possible
-
Detangle regularly
-
Use lightweight products
-
Trim ends when needed
-
Deep condition monthly for softness
Consistent care helps preserve the look, texture, and longevity of the wig.
The Goal Is Confidence, Not Perfection
Wig customization is not about making yourself look different.
It is about creating hair that feels comfortable, believable, and aligned with how you want to show up every day.
The smallest changes can completely transform how natural a wig looks and how confident you feel wearing it.
Take your time. Learn what works for you. And remember — the best wigs are not always the most dramatic ones.
Sometimes the most beautiful install is simply the one that looks effortless.



 No products in the cart.